- Updated: April 26, 2023
Carl's Place DIY Golf Simulator Review
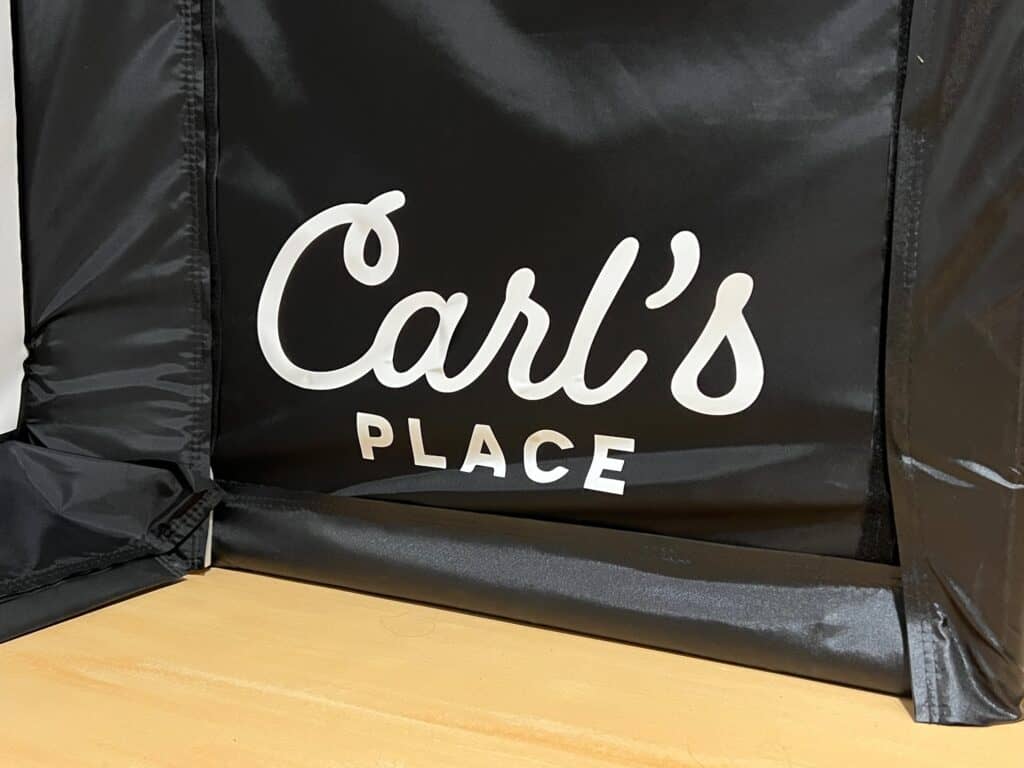
Carl's Place Makes Dreams Come True
Ryan Heiman
Founder and head author at Independent Golf Reviews
I transformed my office with a Carl’s Place DIY Golf Simulator about 6 weeks ago. Carl’s Place allows you to customize your golf simulator needs to the exact space you have in your house, office, garage, or shed to create you very own golf simulator. Something that seemed financially out of reach just a couple years ago, is now a reality in the iGolfReviews “Office” thanks to Carl’s Place DIY Golf Simulator Kit.
This is the definitive Carl’s Place DIY Golf Simulator Review for 2023.

Having an indoor golf simulator was something of dreams for most golfers. It was reserved for only the rich because of the thousands and thousands of dollars it would cost to install a golf simulator. I saw the price tag year after year and never dreamed of having one in my own home. Carl’s Place changed all that with their affordable DIY golf simulator. But just because it is affordable, don’t think cheap or low quality. This simulator is as good as any commercial one I’ve hit on that costs 10x more. Carl’s Place made my dreams come true of having a golf simulator in my home, and I hope after reading this, your dreams can come true too.
The Space
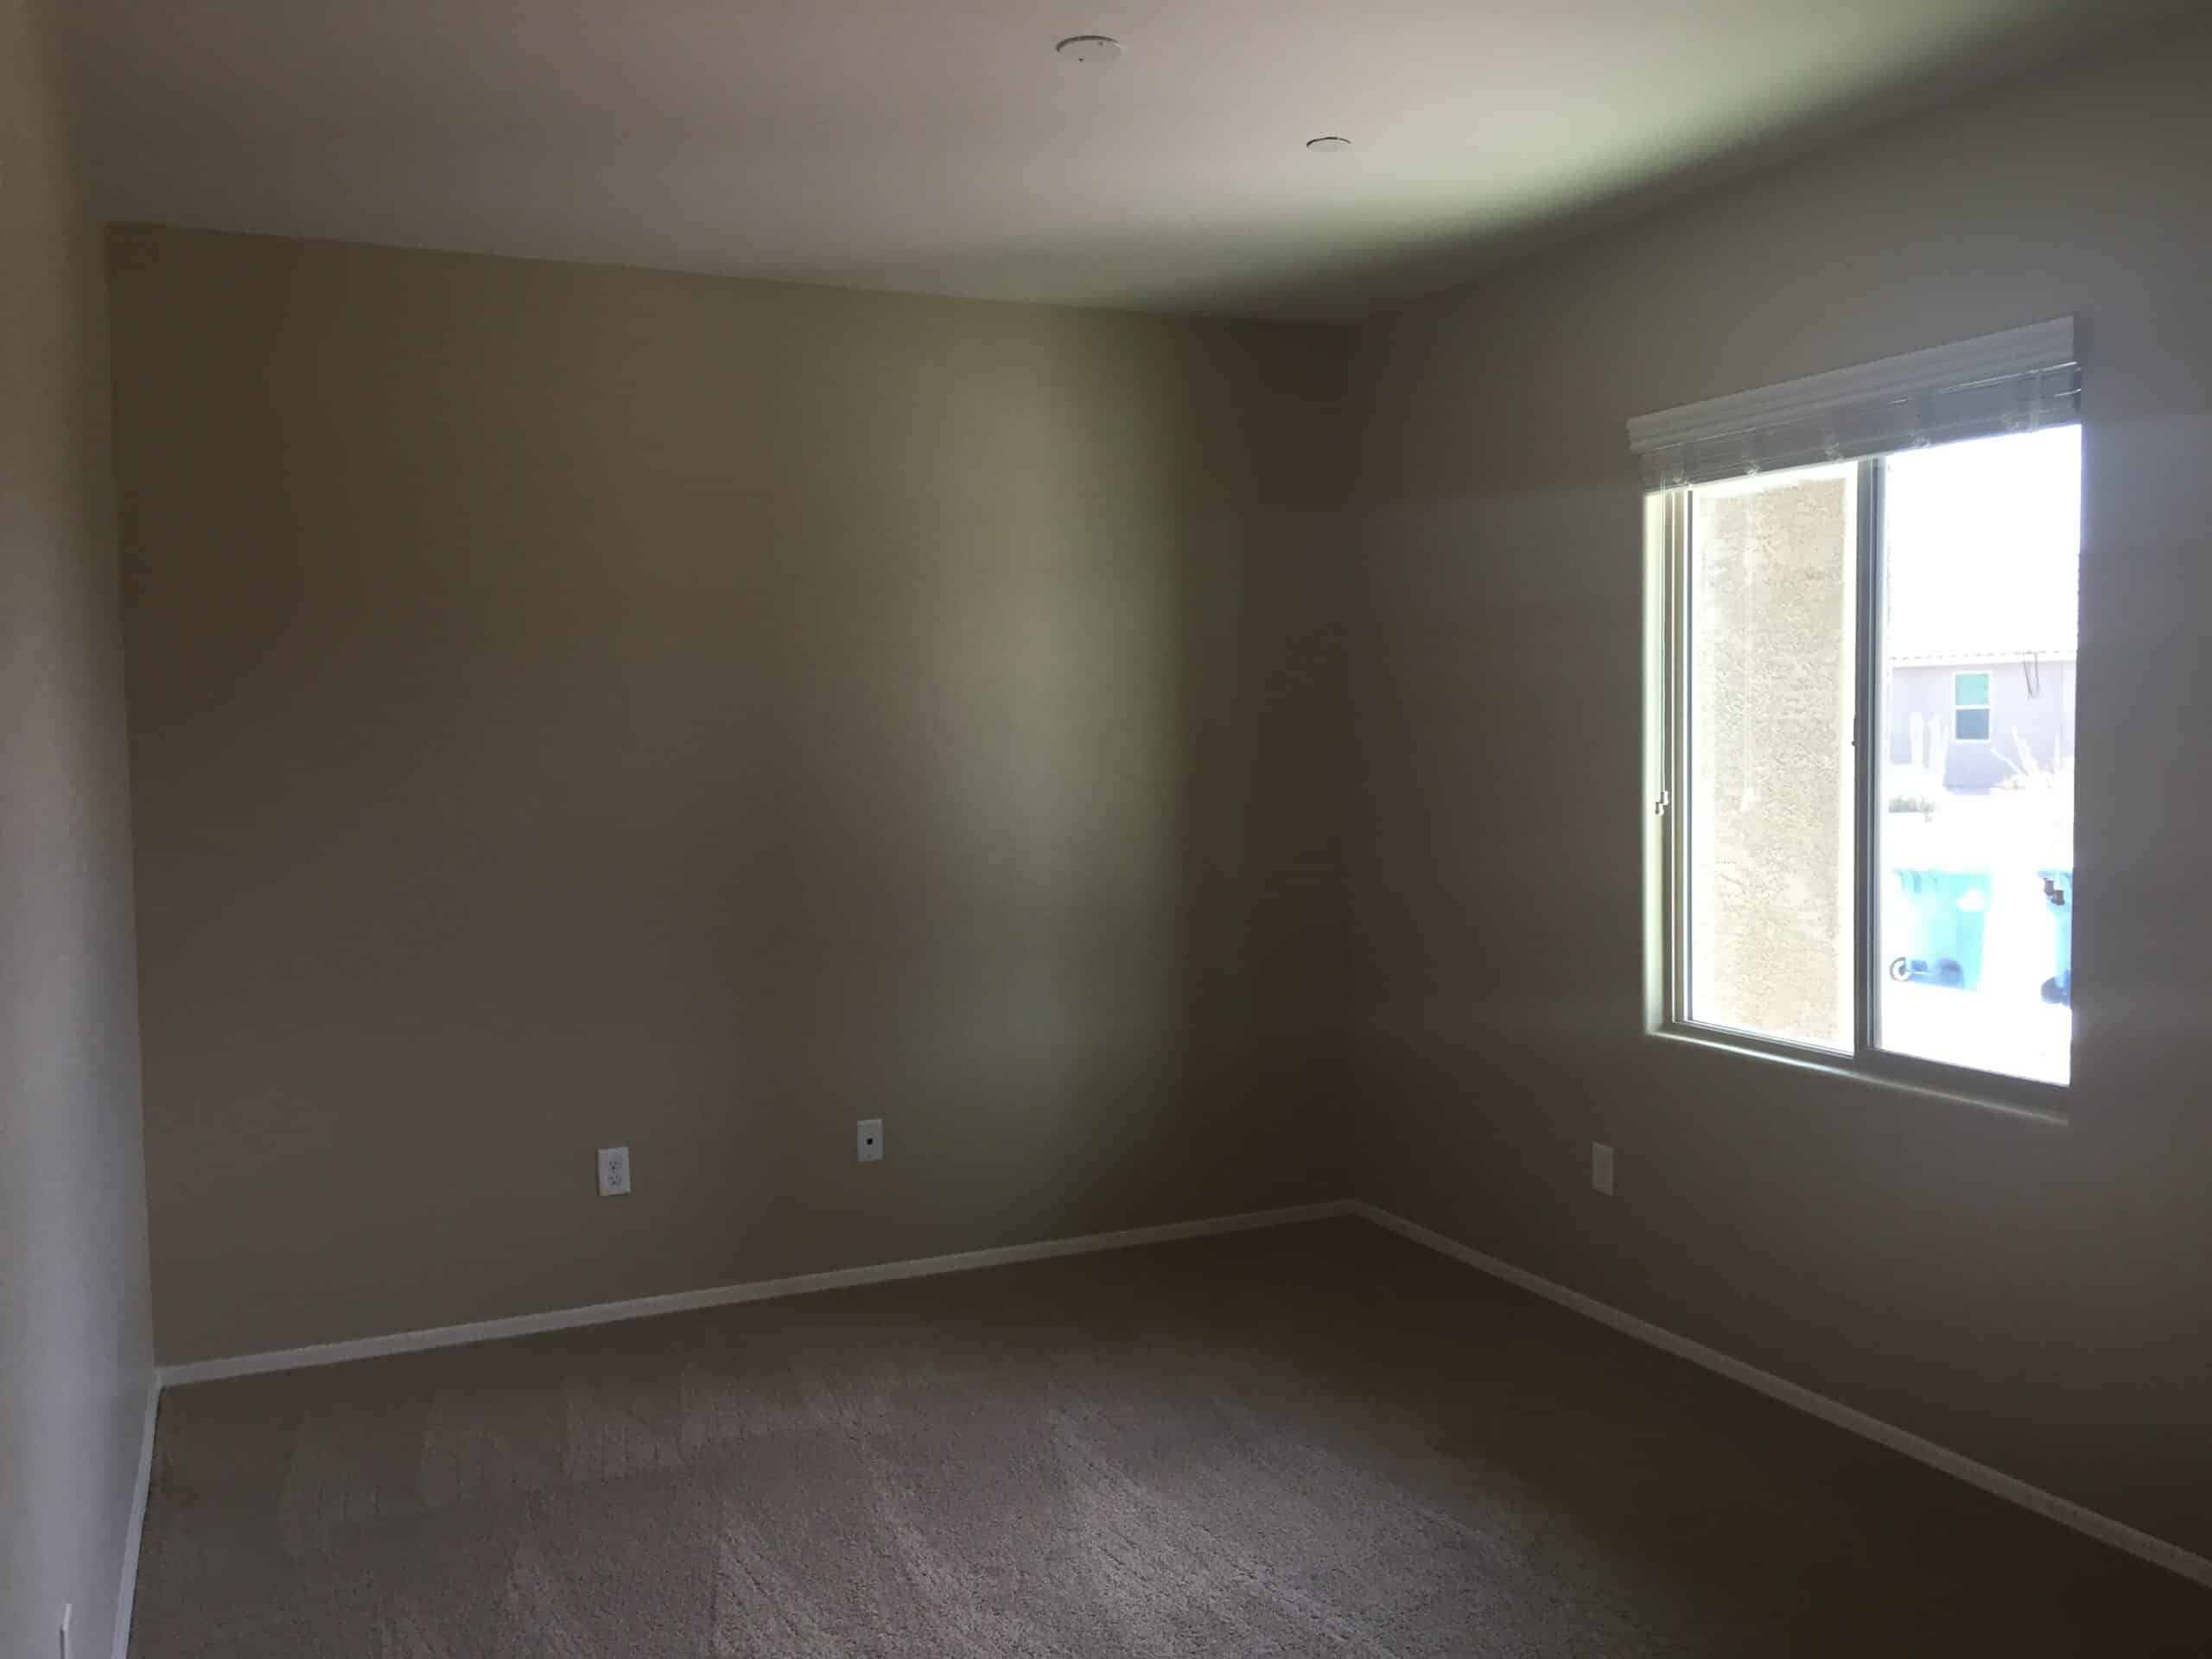
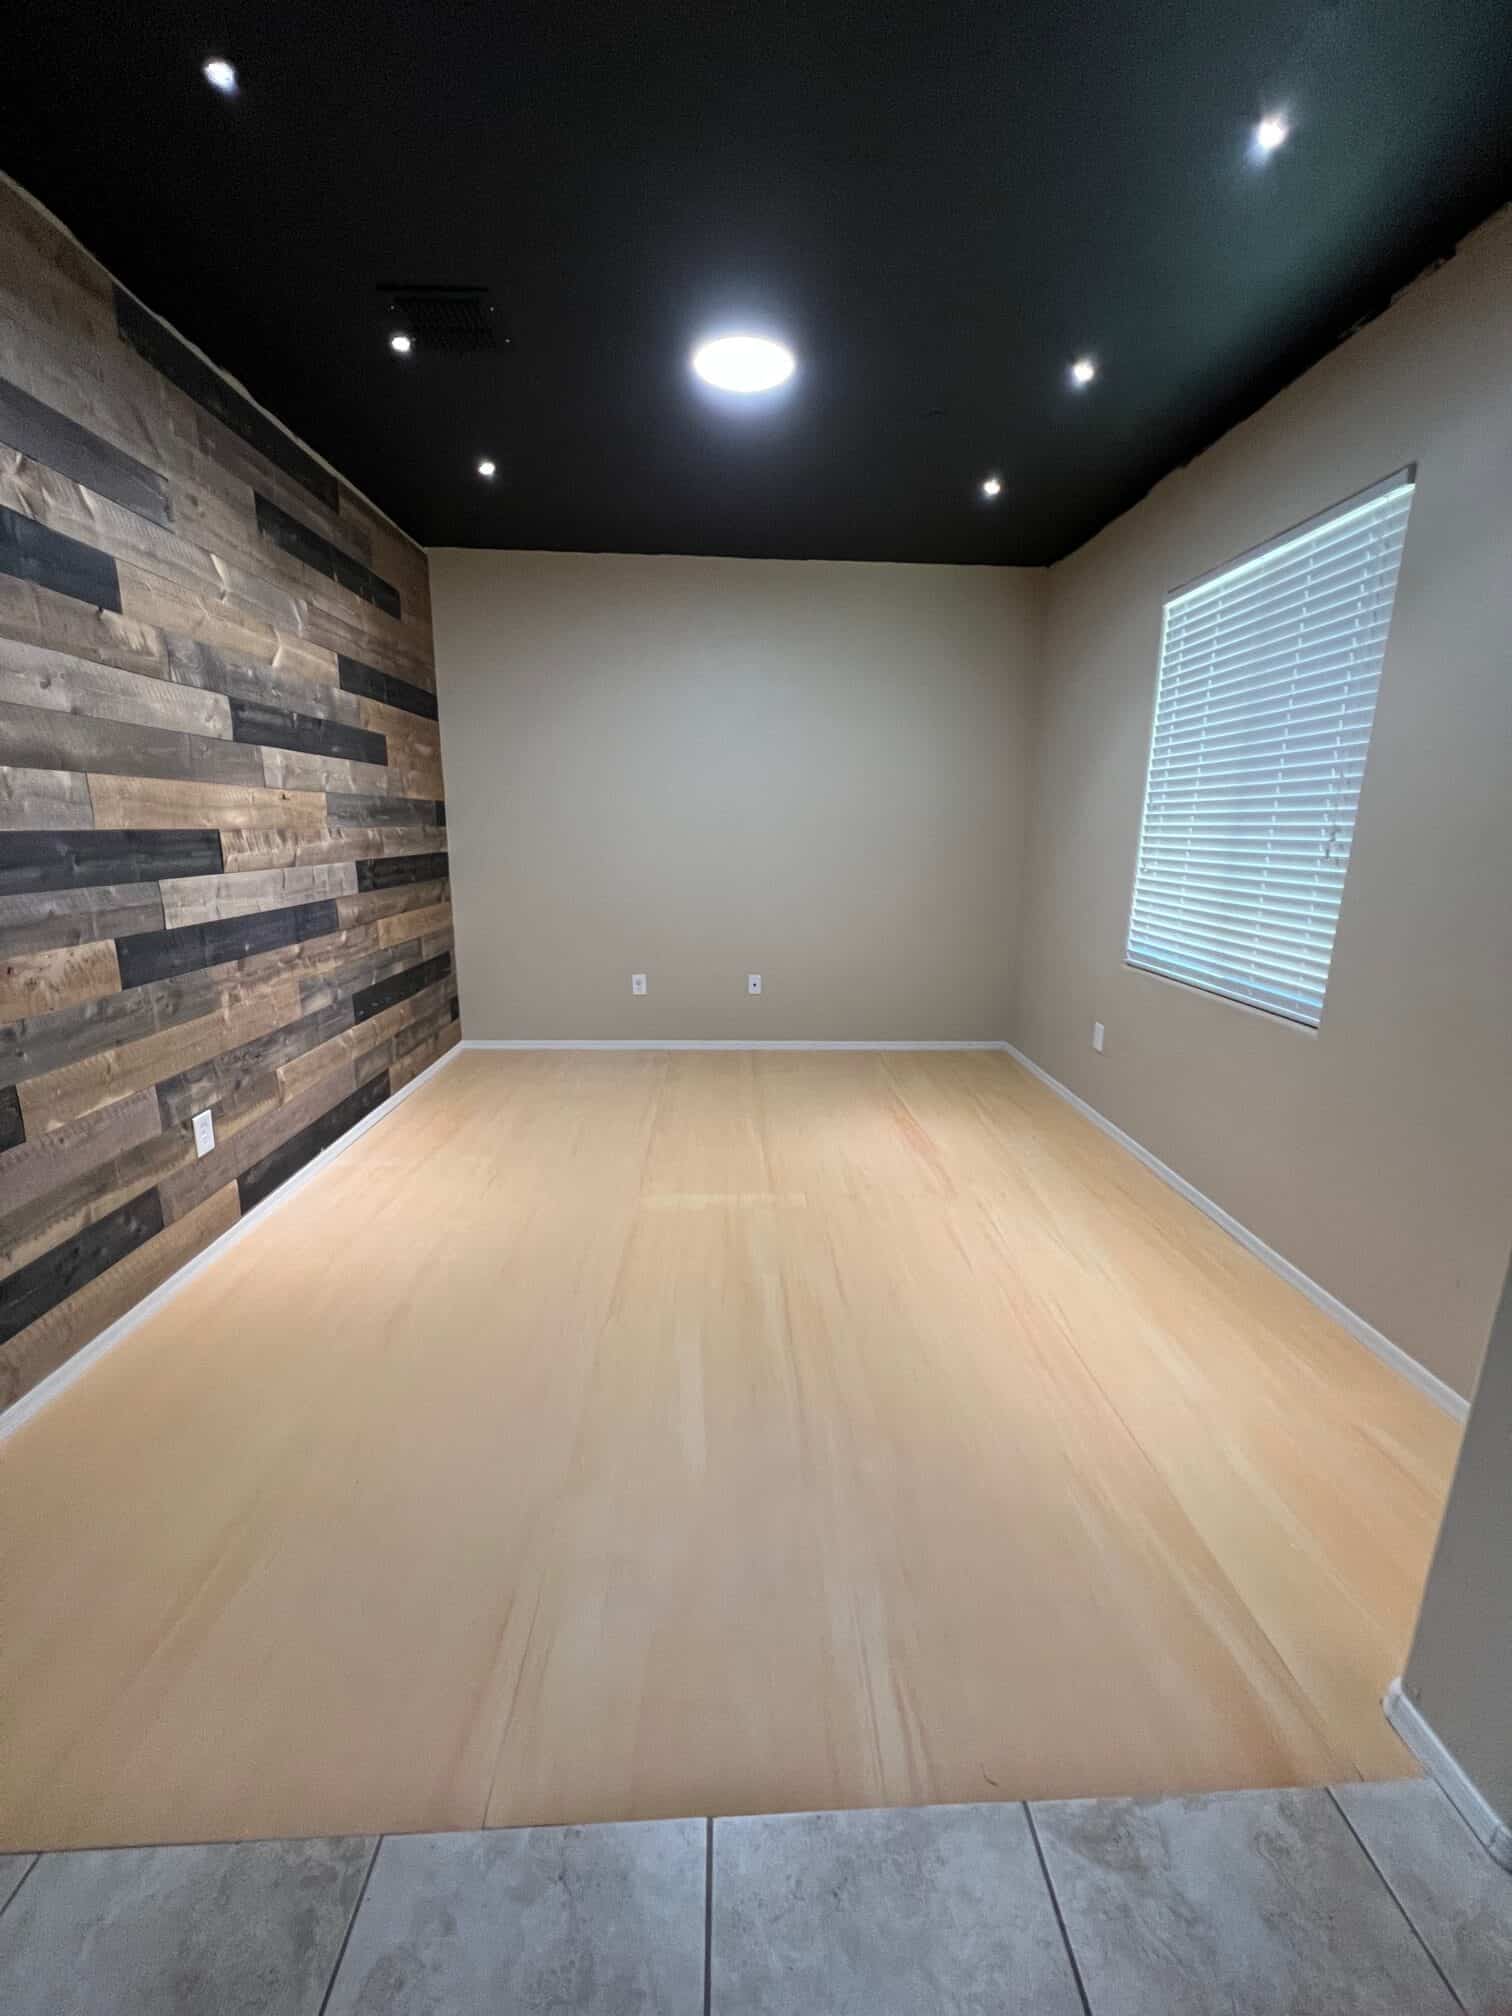
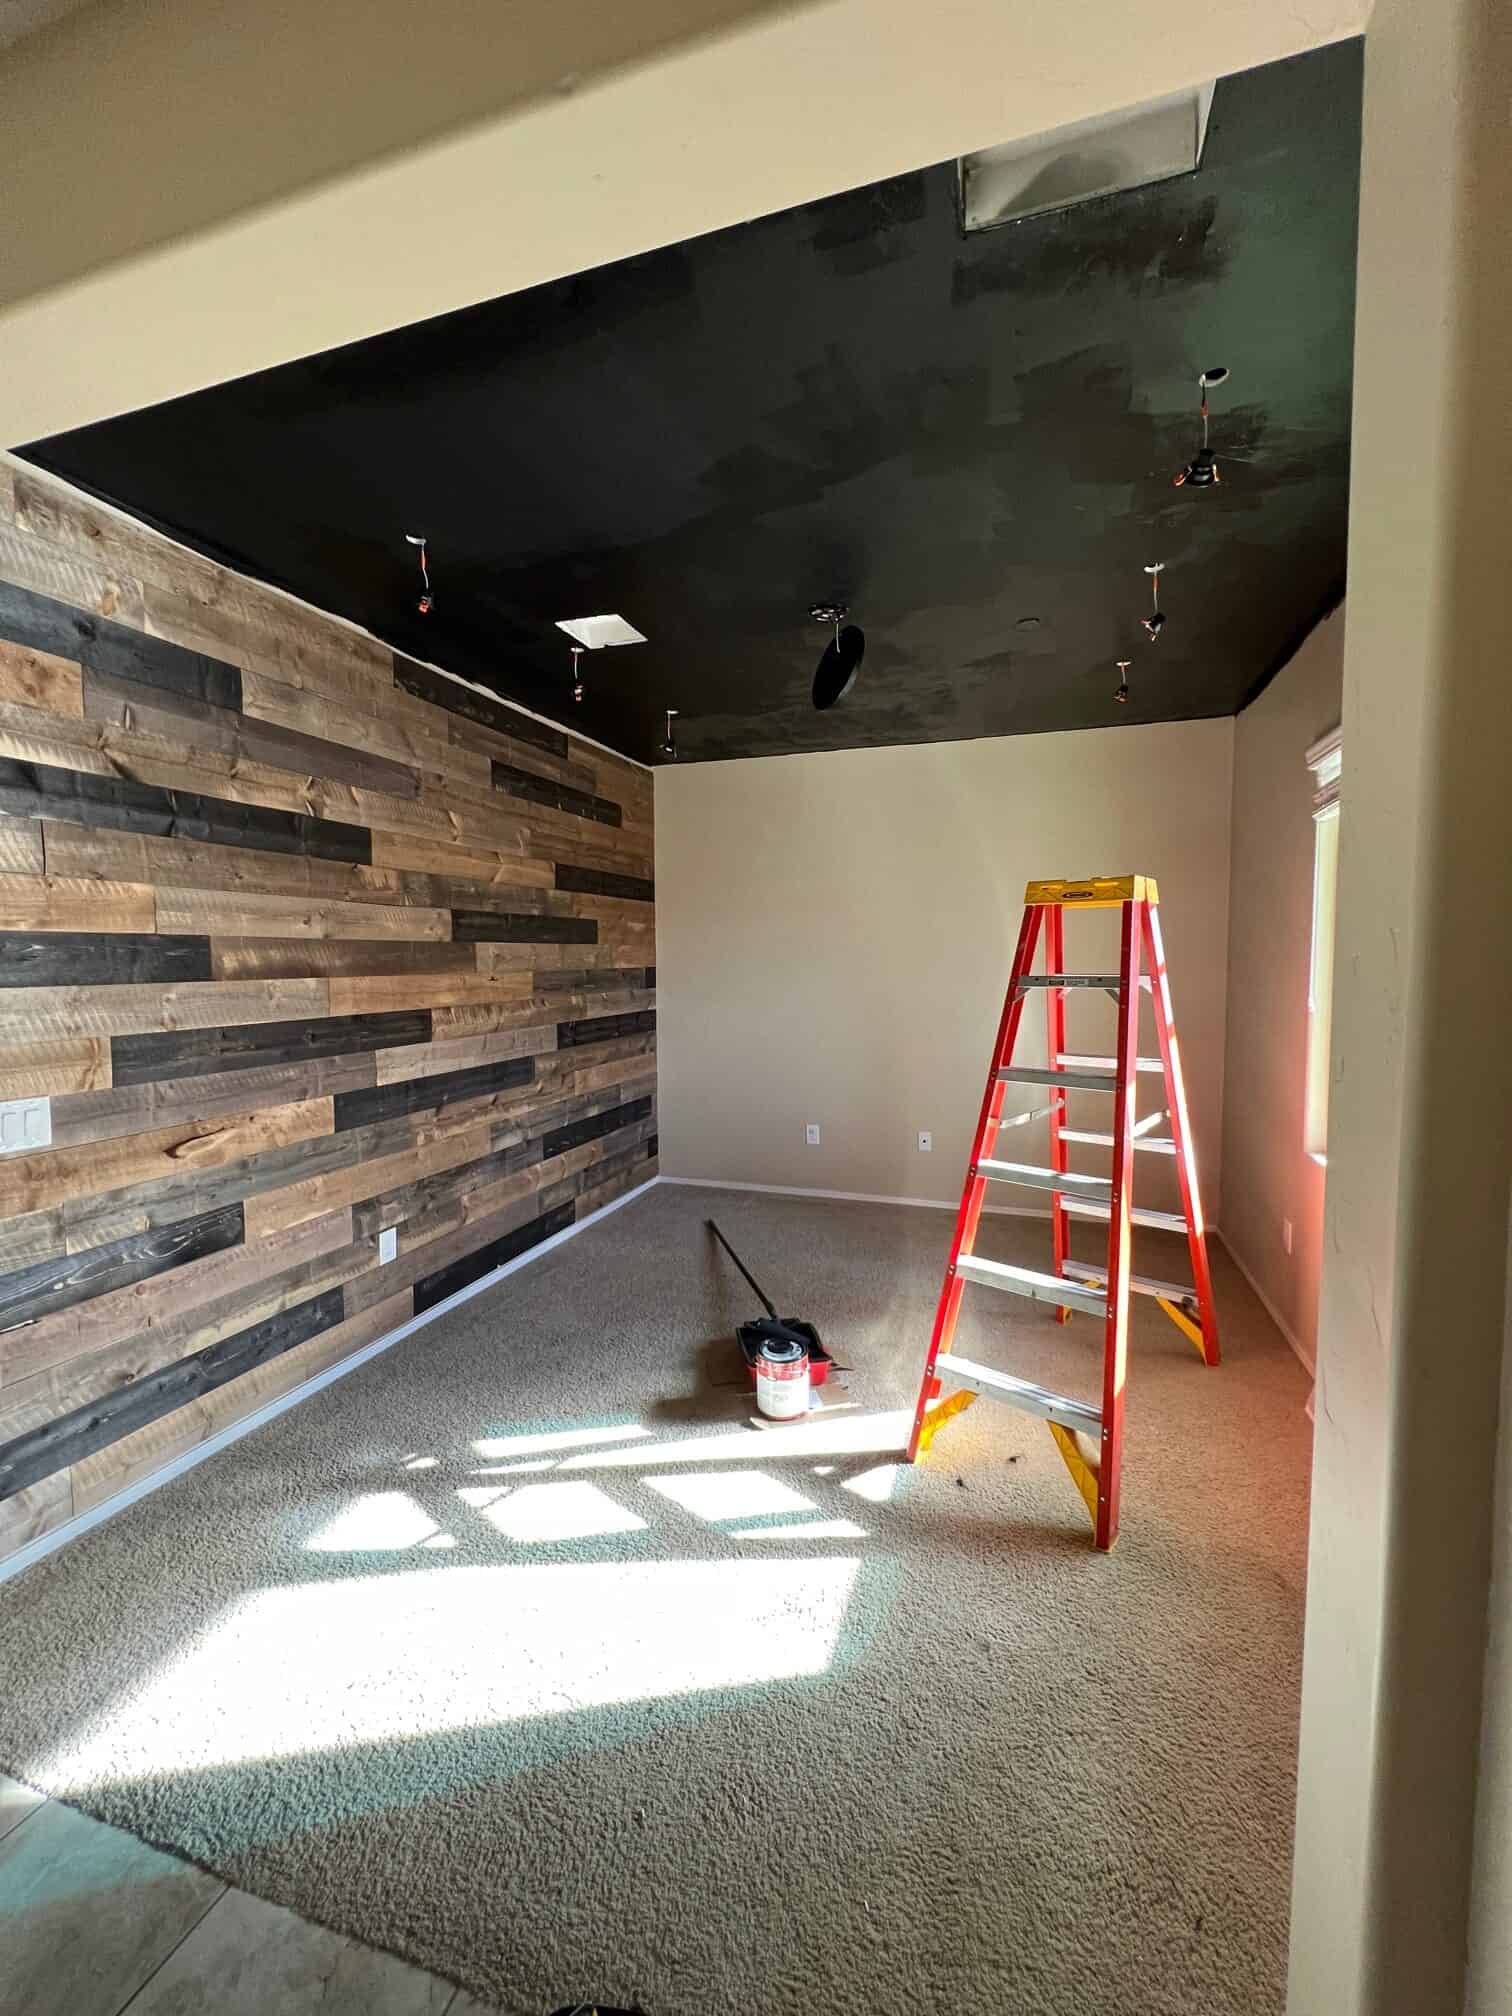
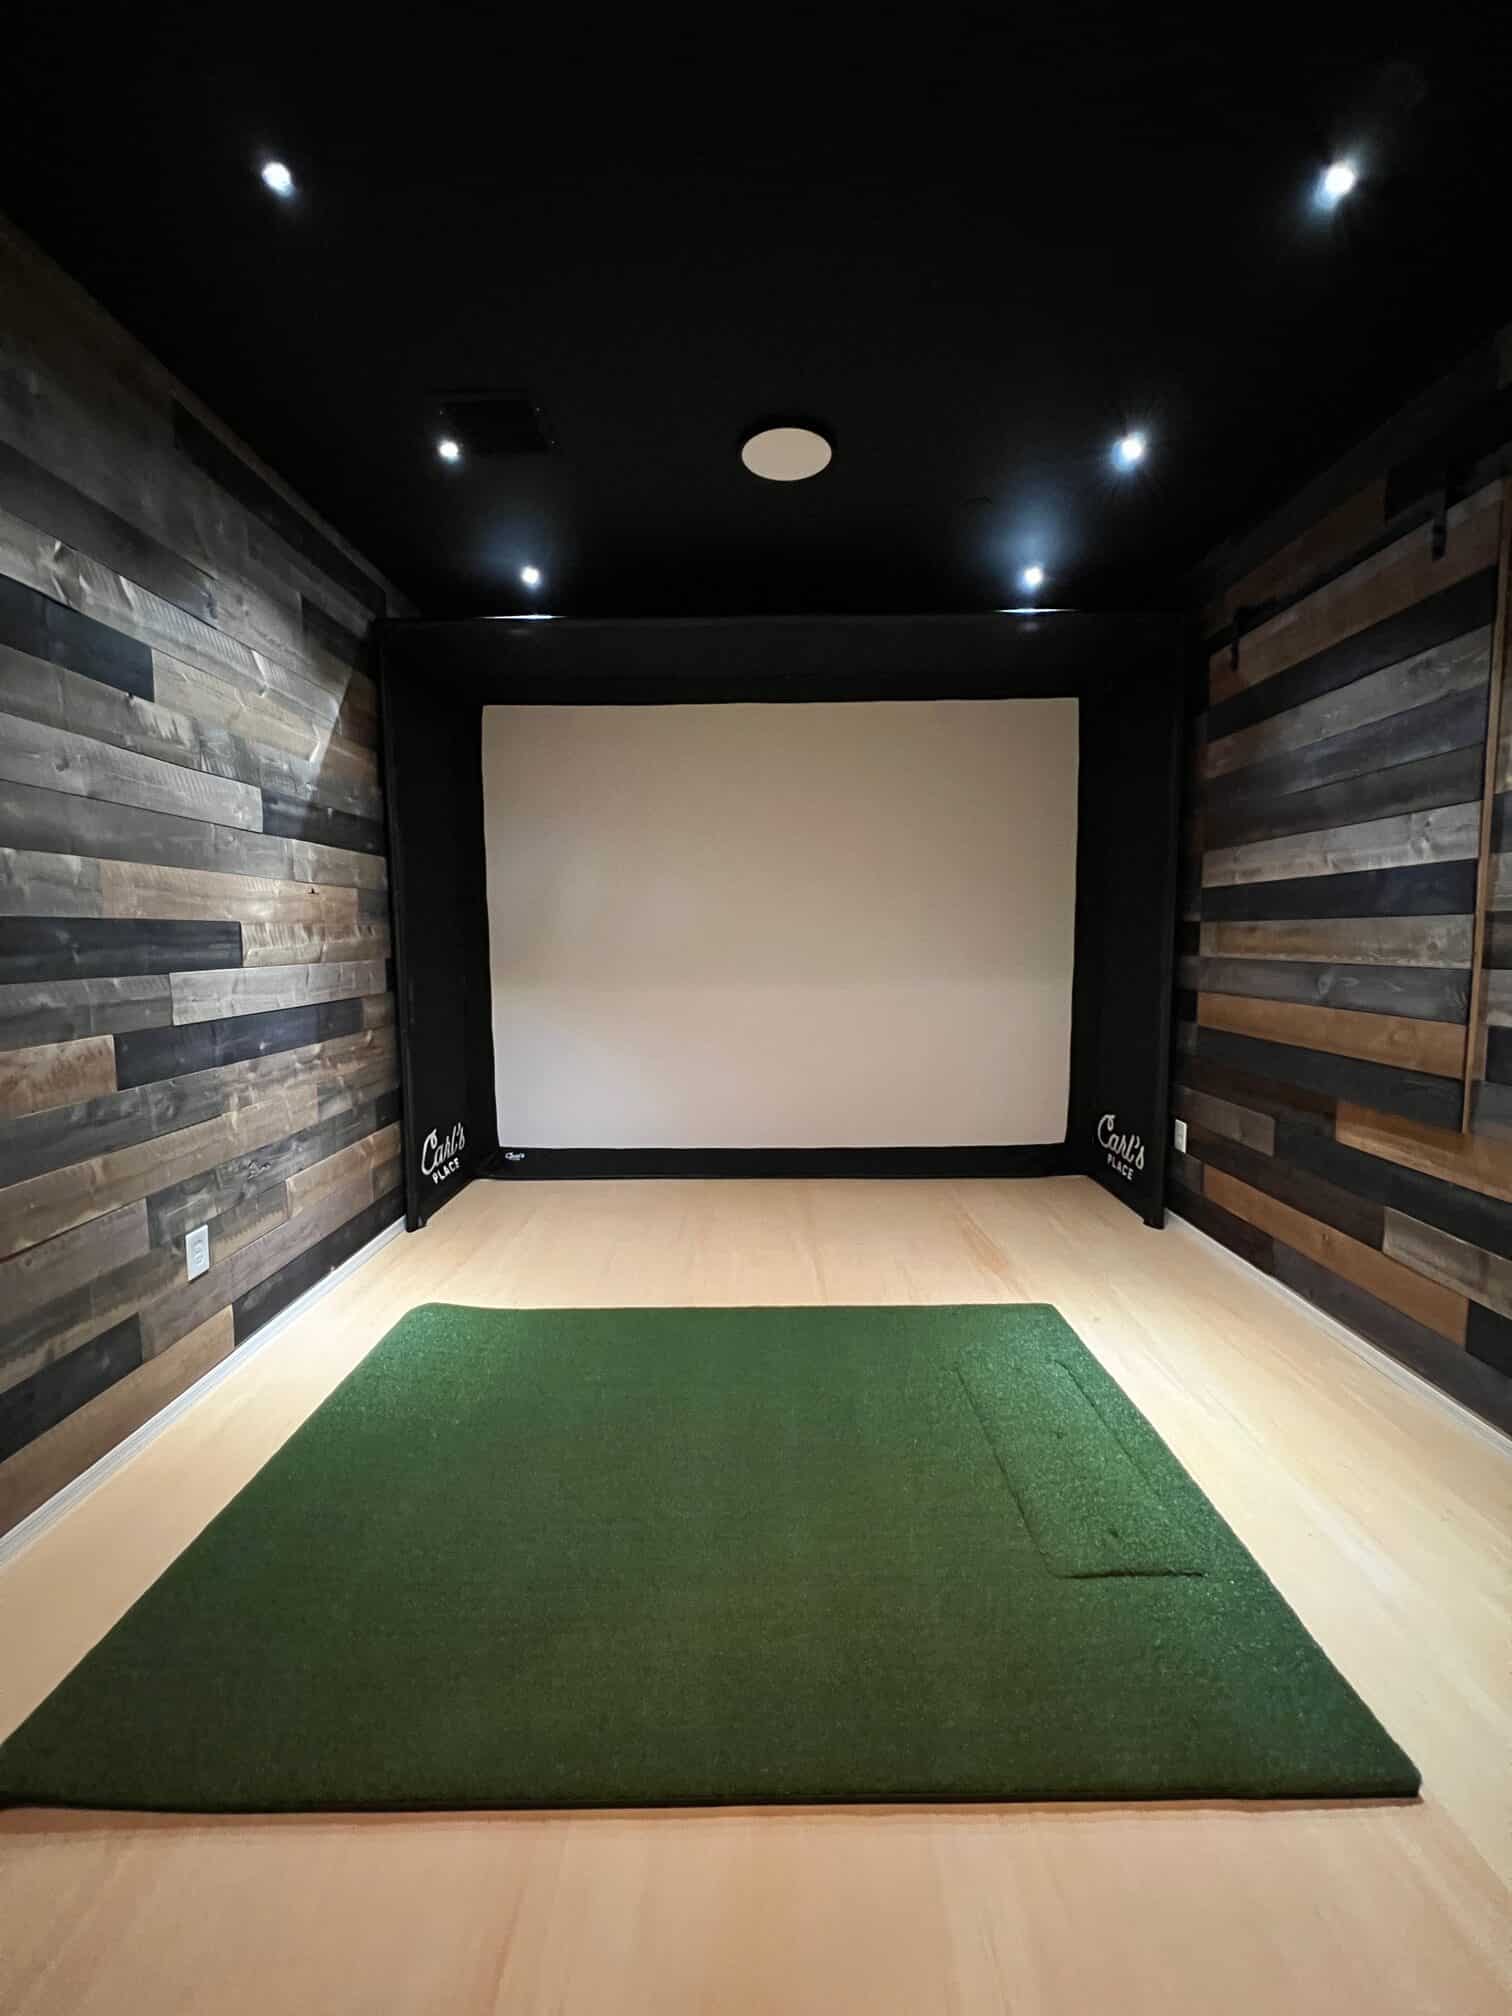
The starting point for a Carl’s Place DIY simulator is the space. Do you have a spare room, basement, garage stall, shed or at minimum 11x 12 x 9? That is about the smallest space you can set up a golf simulator. The more space the better. I had an 11 x 13 x 9 office. While it is on the small side, it is big enough to swing driver. I do have the added bonus since it opens to a hallway which adds 6 more feet which allows more launch monitor space. 9 foot ceilings are also a must. You can’t swing clubs with an 8ft ceiling. I know not every house has this kind of space, but if you do, read on to see how to transform it into a Carl’s Place DIY Golf Simulator.
Non Carl’s Place Supplies
Carl’s Place provides the screen, enclosure, projector, launch monitor, hitting mat, and golf accessories. However most rooms/space don’t have proper lighting, wall protection or flooring. My office had a window, carpet and terrible lighting. I installed barn wood from Home Depot on the walls, painted the ceiling black, installed down lighting, built a window protector, and replaced the carpet with rubber flooring. This was about $500 worth of supplies and a weekend of work. Depending on where you are installing your simulator, it may require some DIY prep of the space. I suggest doing it well so that you want to come to this space and show it off to friends.
The Carl’s Place Build Your Own Simulator App
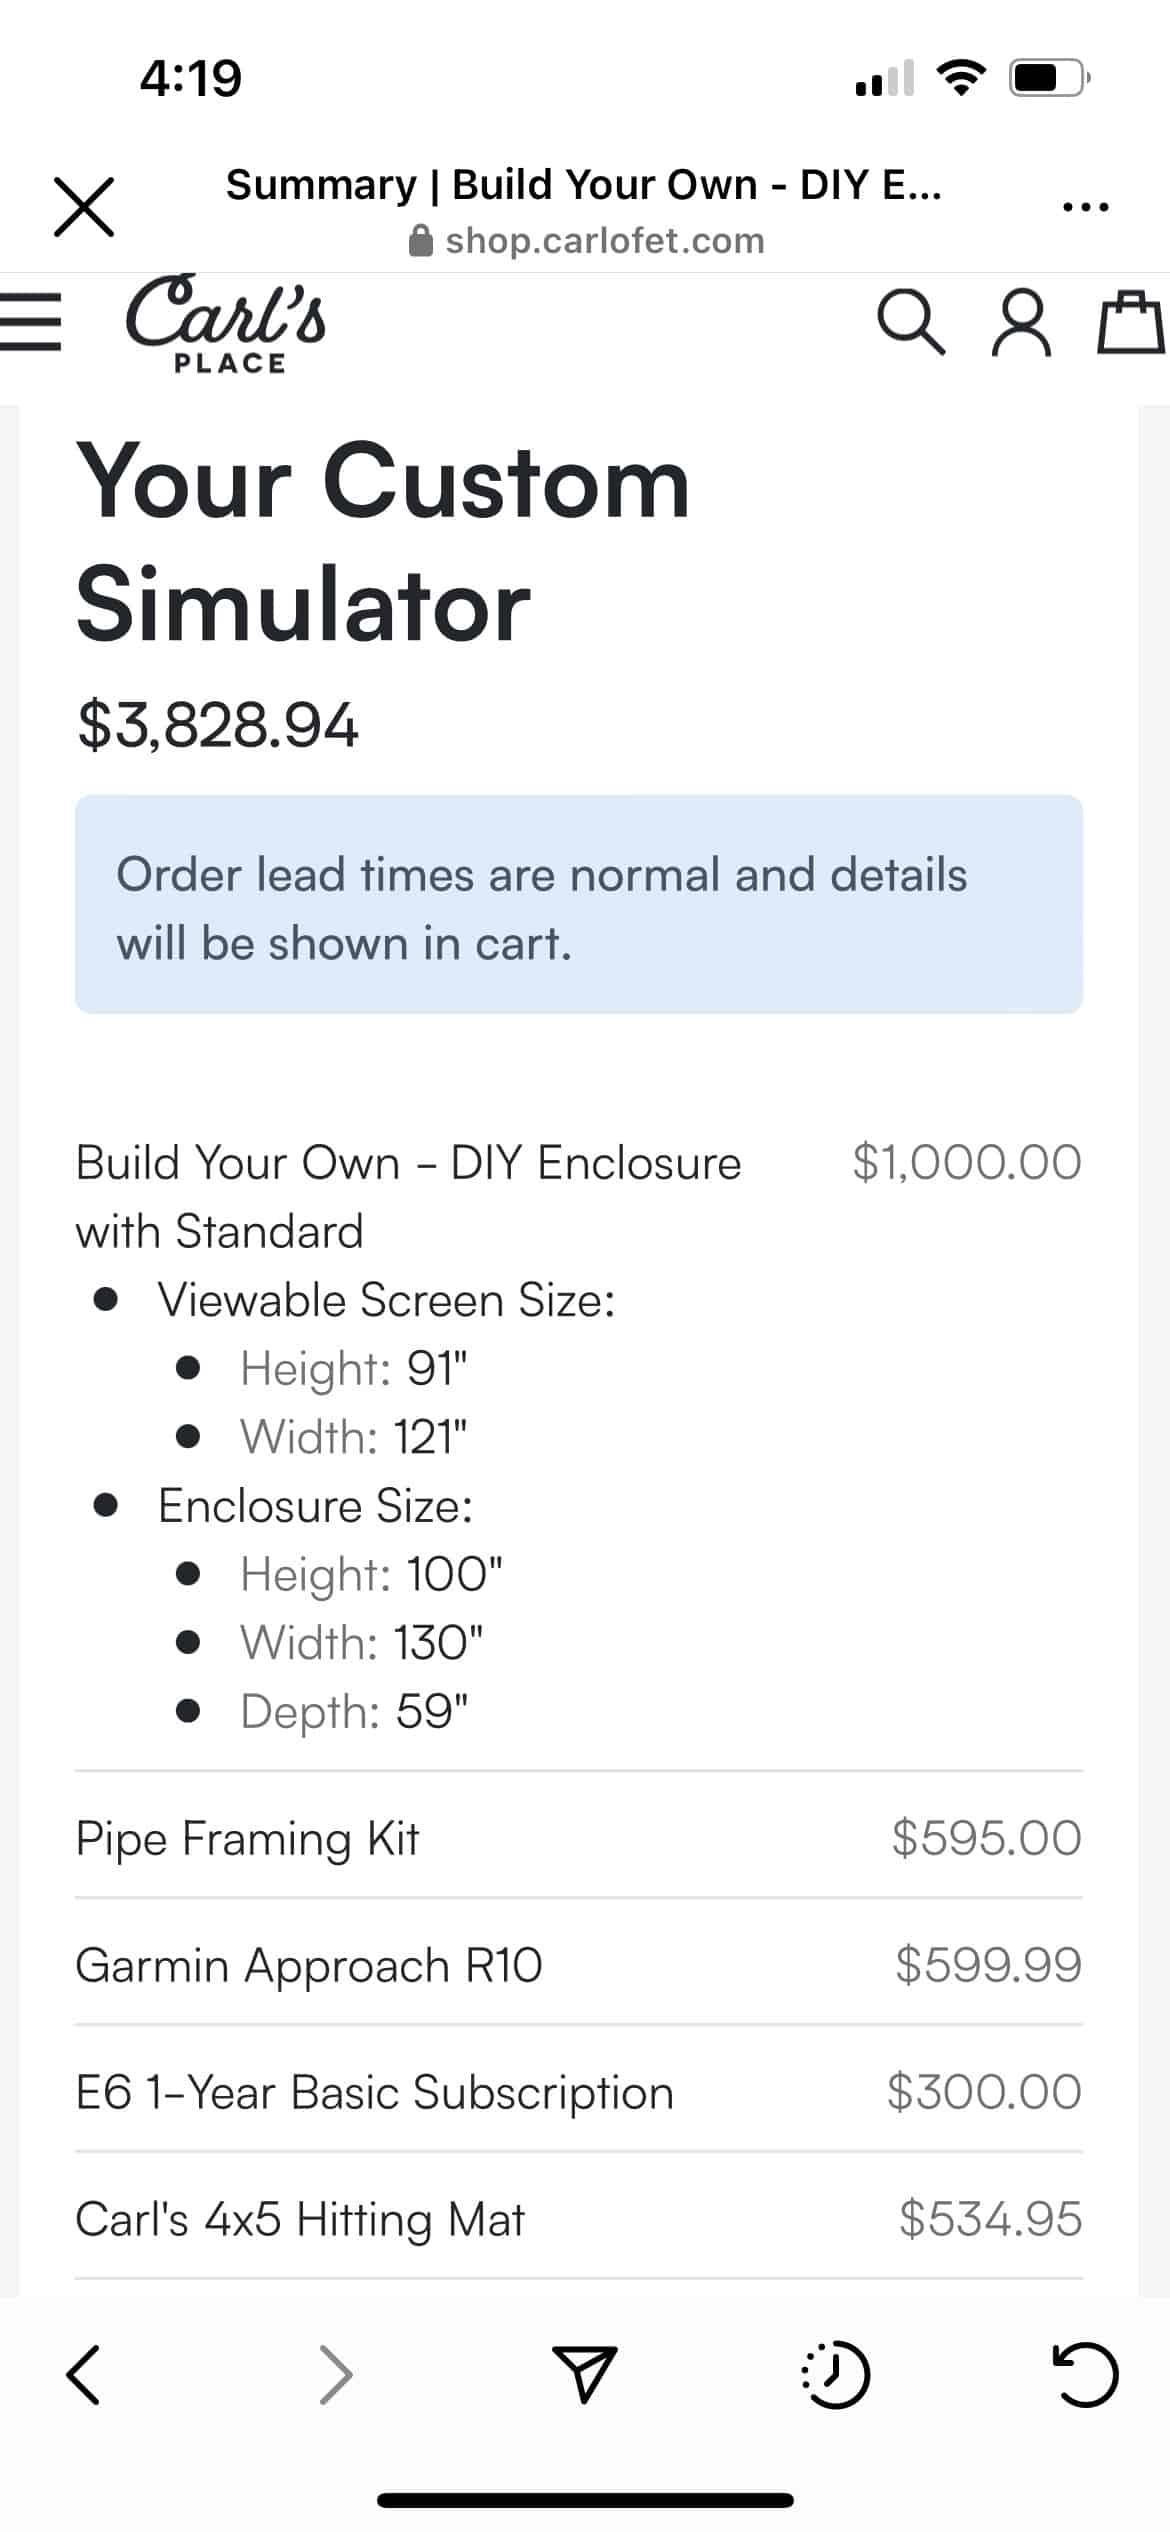
This is the one feature that sets Carl’s Place above their competitors. Their DIY Simulator App Builder allows you to plug in your room dimensions and get exactly what you need for your space and wants. I built the “bare minimum” golf simulator above and you can see it came to $3800 + tax so approximately $4k is the base price. At first glance that still isn’t “cheap” but considering how much golf costs in general, and the value it adds to your home; it is a solid investment in your game, your home and even your family. (more on that later) I built mine slightly different as you can see on the screen shot with premium screen, bigger hitting mat and bring your own launch monitor(since I’ve been working with FlightScope for years.) The app walks you through every detail and allows you to make it fit your space and budget. If you go the “best” of everything, then yes that $10K number is probably still easy to hit.
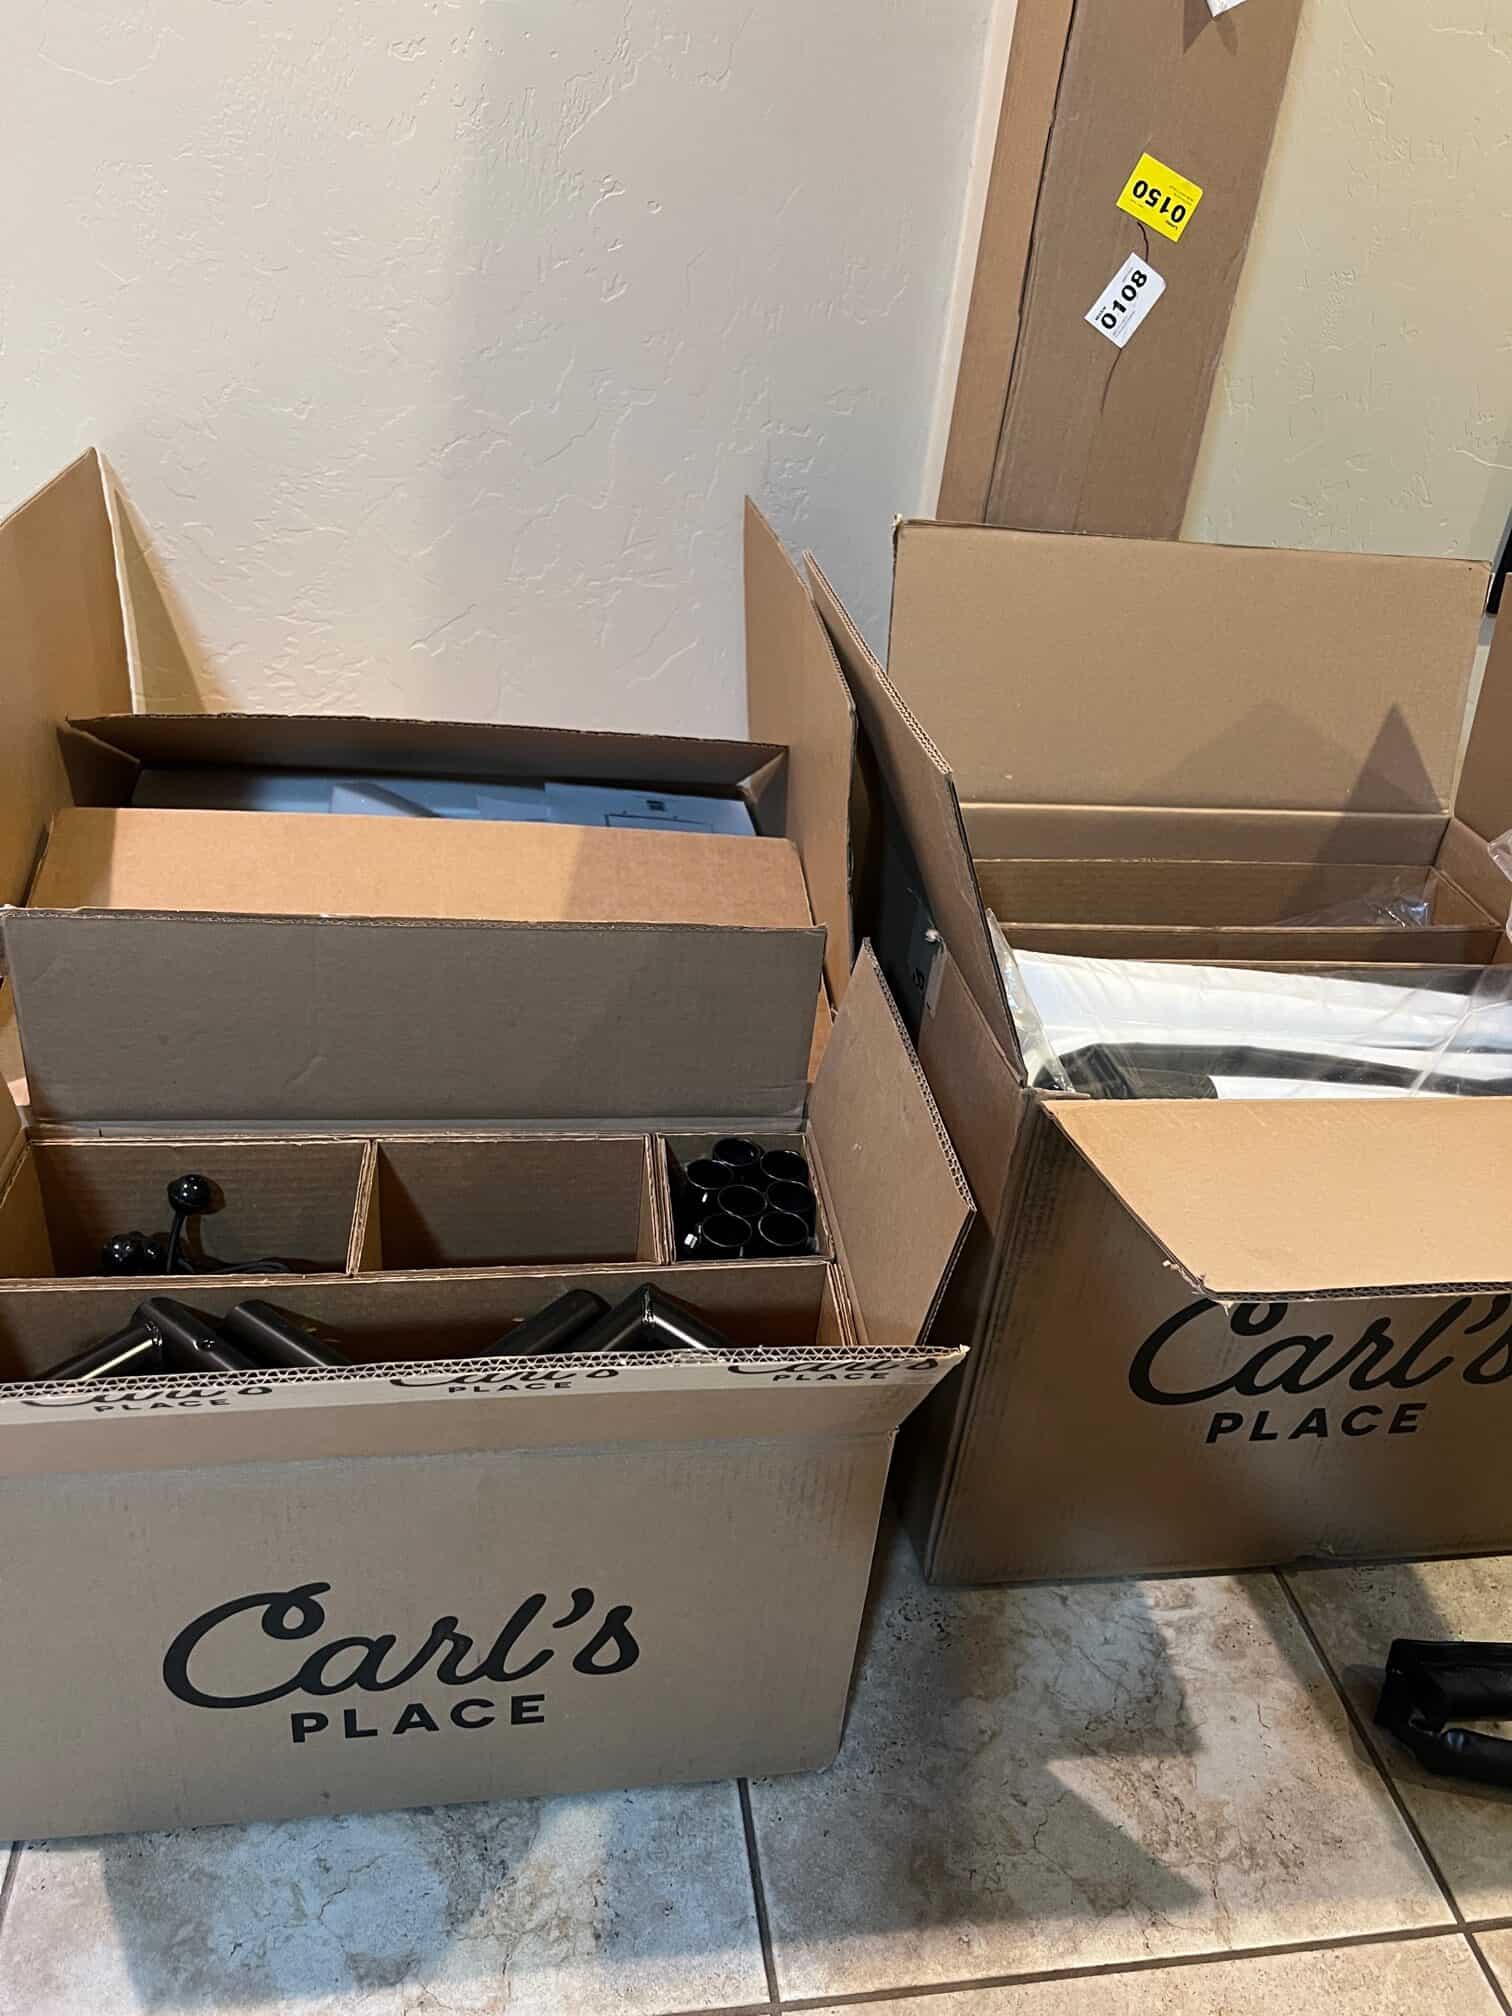
The Carl’s Place DIY Simulator Build
In about a week or two your packages will arrive with everything you ordered to build the Carl’s Place DIY Simulator in your home. The multiple boxes are big and heavy, but labeled with good instructions and video links to show you how to build your simulator. It only takes a wrench or socket to tighten the pipe enclosure and a ladder. That is really about it (unless you are doing some custom mounting of the projector and wires) It only took me a couple hours to build the Carl’s Place simulator from start to finish. I was surprised at how easy and quick it was. I went from nothing to hitting balls in my office in 2 hours.
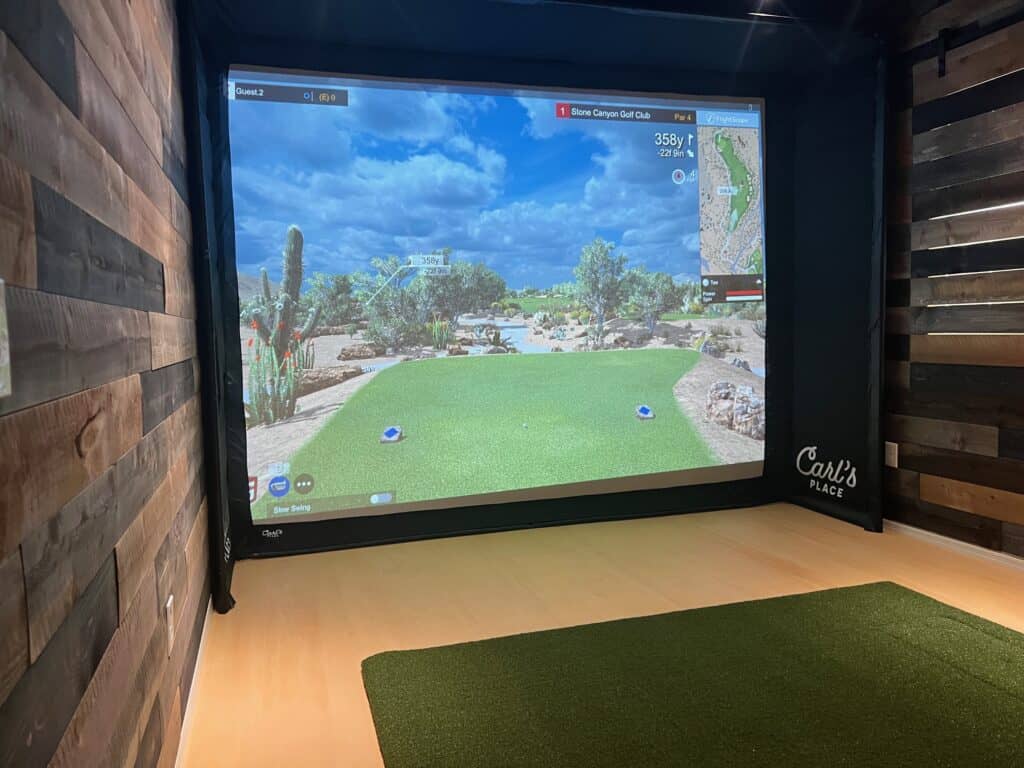
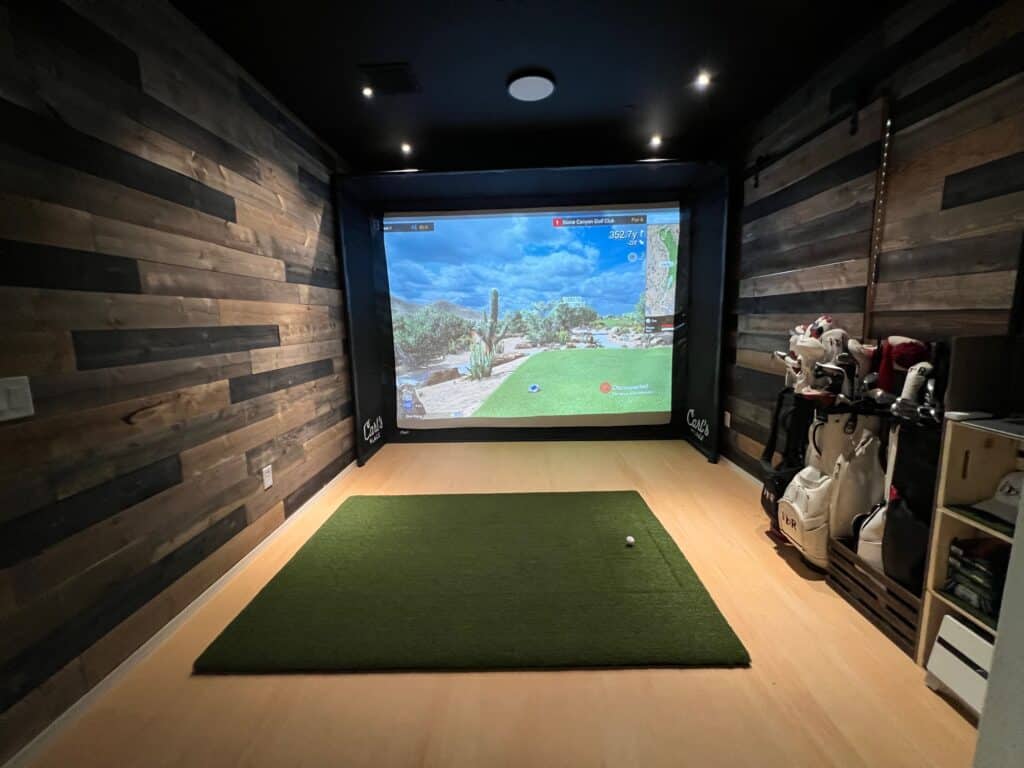
The Carl’s Place Premium Screen and Enclosure
I believe that this is the most critical component of a golf simulator. Carl’s Place makes their own screens and enclosures. This sets them apart because they can customize a screen and enclosure to your needs. While they have “standard” sizes, there a plenty to choose from depending on your space. The enclosure is designed to match the screen. While they often want this as big as possible to catch any stray balls, they can also make them shorter like mine so that it fits the space properly. The Premium screen offers a better resolution for the projector and since I’ll be hitting so many golf balls while playing and testing clubs, I wanted something that is the most durable they offer. For the additional $300 is is well worth it. I also went with the foam pads around the piping to reduce “bounce-back.” The pipes for the enclosure come in sections that are easy to assemble, even for one person. The screen and enclosure velcros and bungees around the pipe frame. It takes a few test runs to get it just right with the tension and fit. I had to reduce some bungees to reduce the “bounce-back.”
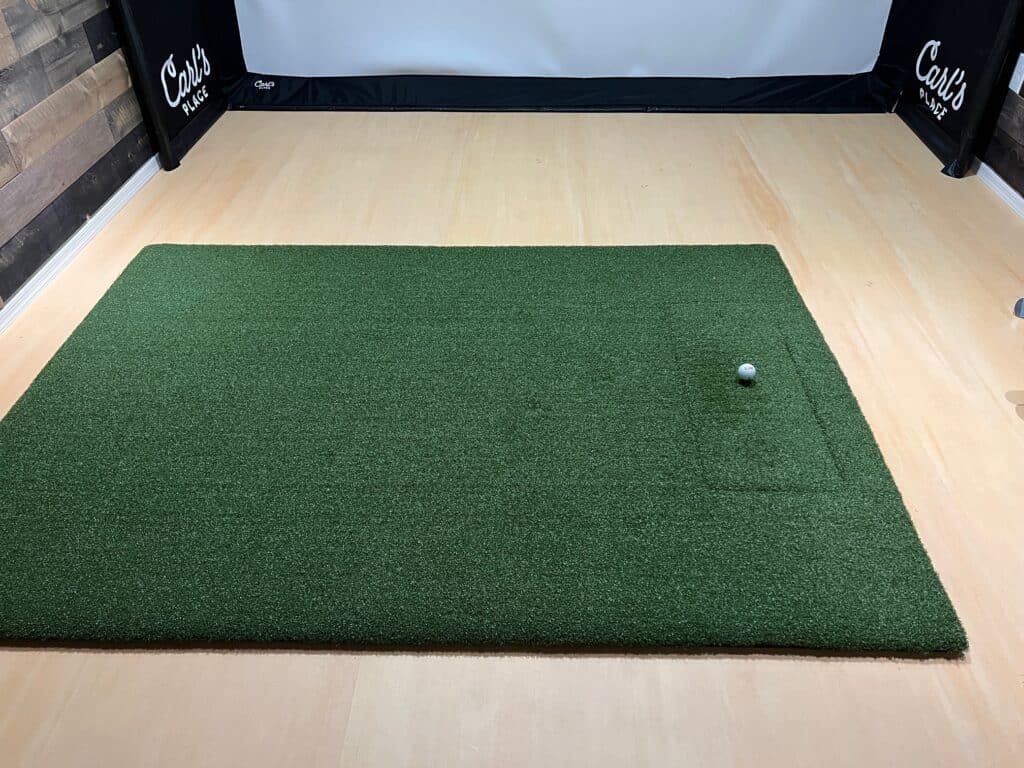
The Carl’s Place “Hot Shot” Hitting Mat
I’ve hit golf balls off a tiny square of turf, but like many things the bigger the better so that you have the most comfortable stance and can move around a little so that you don’t wear the same spot on every hit and stance. 5′ x 7′ Carl’s Place Hot Shot hitting mat is designed with an interchangeable hitting strip. This allows you to swap out the section that takes the most abuse with a new one once it is wore down. This reduces future costs for your hitting mat too. I debated embedding this whole mat into the floor or getting more turf for the whole room, but this feels comfortable and functions excellent for shots.
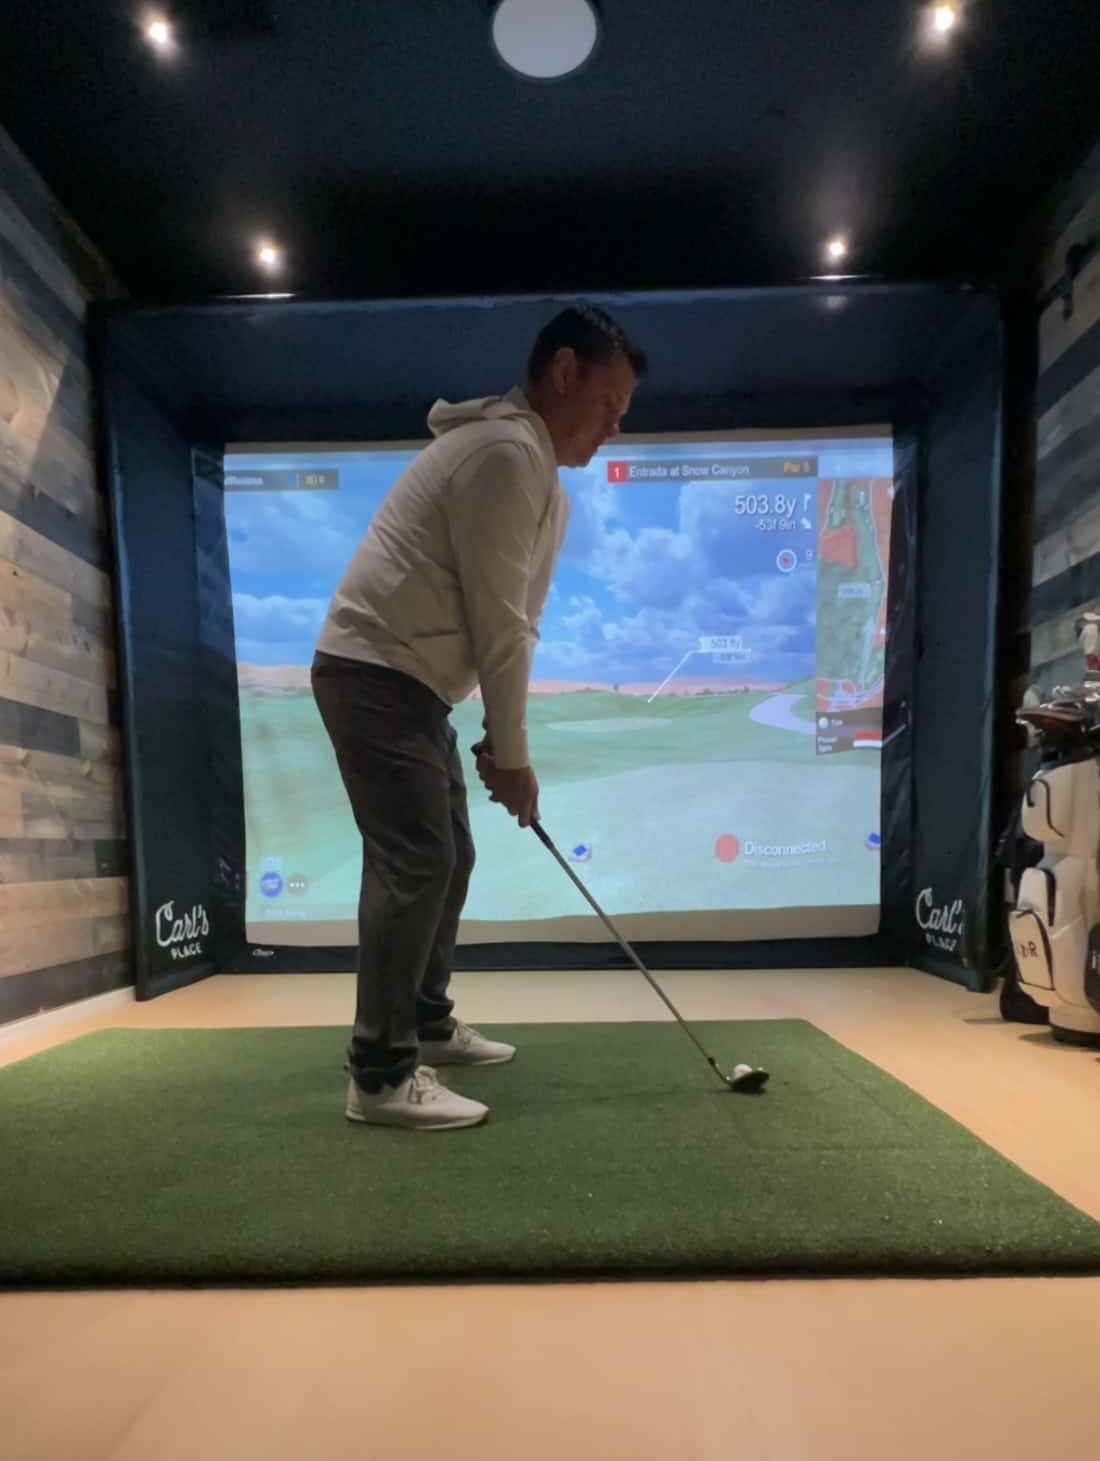
The Projector
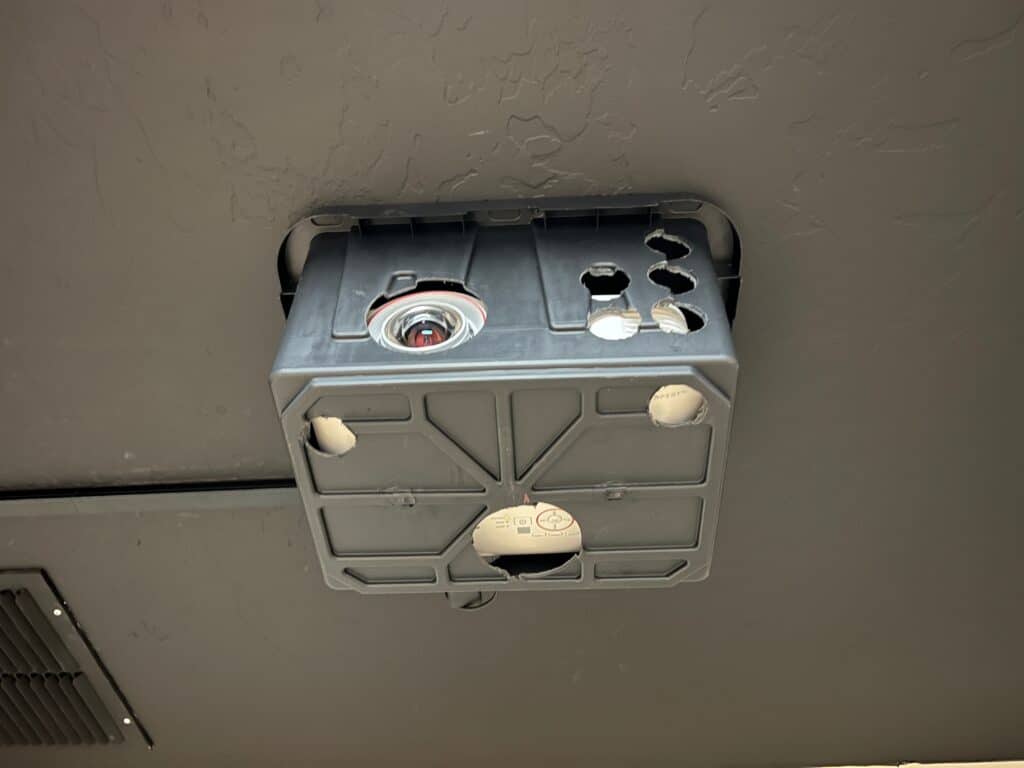
The project is key to a golf simulator; otherwise you are just hitting into a blank wall. Carl’s Place offers a wide selection of projectors that they have tested which work well for golf. Even their cheapest projector (the BenQ TH671St) is excellent. I went this route since my room was dark and it fit my “throw” needs. I am very happy with it. I mounted mine on the ceiling right above the ball. I then built a custom cage around it using a black Home Depot plastic tub which I drilled out holes for cables, lens and air flow.
If you have your own projector, this is another area you could save some funds. However I don’t think hopping on Amazon and buying the $100 projector will be worth it. Those have so many limitations and rarely work like advertised, I’d still go with Carl’s suggestions on this one.
The FlightScope Launch Monitor and Software
I have been working with FlightScope for almost 10 years so they are my “go-to” launch monitor. I was able to use my FlightScope Tour Xi launch monitor so I didn’t need this part of the Carl’s Place DIY golf simulator package. I think the new Mevo + is the best balance between performance and price. If however you are on a tighter budget, the Garmin R10 Approach is the most economical option and would work great. (review here) It comes preloaded with some of its own software. Since I had the launch monitor, I went with the E6 Connect software which runs $300 a year. This comes with 27 courses and can be upgraded to add 57 more. It has awesome graphics and feels very realistic. I like to play courses I’ve played in real life to compare and the experience is very similar. Obviously you need a computer or tablet to connect the launch monitor, software and projector. Since most everyone has one of these, that shouldn’t be a problem. I hard wired everything together with HDMI, power and Cat5 making it fast and reliable.
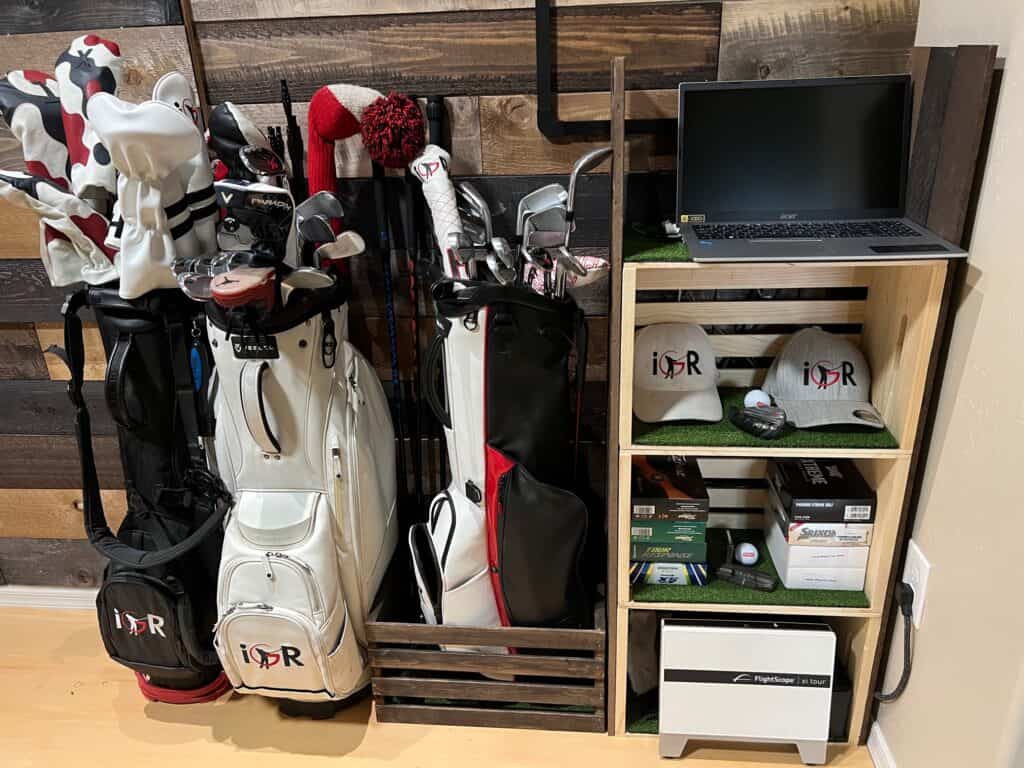
I built a custom desk to hold golf balls, accessories, a golf bag, clubs and my computer. I used Home Depot wooded bins which run about $15 each. It was a quick and easy DIY project to have all my golf stuff secured and close at hand.
Enjoying a Carl’s Place DIY Golf Simulator in Our Home
I knew I was going to love my Carl’s Place DIY Golf Simulator, but I was surprised how much the rest of my family enjoy it. I have 4 boys who have varying levels of interest in golf, but I turn on the simulator and they all gravitate to the “Office” We can enjoy a round of golf as a family in our home in just a few hours. It was surprising how family time grew from my hobby. Another side benefit of the golf simulator is that it can double as a theater room. We bring in some bean bags and watch movies and TV on our big screen with just the installation of an Amazon Fire Stick ($35). The office is not only my golf haven, but also family space to enjoy TV/Movies and Golf. While my wife worried about my dissappearing into the “Office” and never spending time with family, it has actually had the opposite affect of bringing us together around the Carl’s Place DIY Golf Simulator.
Summary
Honestly, I never thought I would have a golf simulator in my home. Carl’s Place DIY Golf Simulator changed my mind and made my dream a reality. If you think that a golf simulator is out of reach for you; give Carl’s Place Build Your Own Simulator software a try to see what it might cost you. I think you can get a “turn-key” package for right around $4K. While I know that isn’t cheap, I think it is a great value considering what you get, the quality of the materials and the value it adds to your home. It isn’t permanent either so if you decided to move, you don’t have to leave it behind for the next home owner. The iGolfReviews Office by Carl’s Place DIY Golf Simulators is truly a dream come true as it allows me to golf in my home and brings my family together around this multi-use space. From start to finish, Carl’s place is top quality. Their Build Your Own Simulator app is the best in the business. Their screens, enclosures and hitting mats are also top quality and custom fit for your space and needs. IF you want your golf dreams to come true, check out Carl’s Place DIY Golf Simulators.
For More Information: https://www.carlofet.com
🏌️♂️ Subscribe to
Independent Golf Reviews 👇
Get Golf Discounts & Giveaways from the top brands and stores in golf.
Sign up below to be automatically entered in this months giveaway.
Success!⛳️
You are now an official member of IGR. Keep an eye out for the perks.
No spam, ever. 🔒
Share
Receive the best golf discounts available exclusively for our subscribers and be auto entered into our monthly golf giveaways!
Success!⛳️
You are now an official member of IGR. Keep an eye out for the perks.
No spam, ever. 🔒
